SPECIAL OFFER ✦ BUY 2 GET 1 FREE! ✦ ADD 3 PRODUCTS TO YOUR CART, AND THE DISCOUNT APPLIES AUTOMATICALLY!
SPECIAL OFFER ✦ BUY 2 GET 1 FREE! ✦ ADD 3 PRODUCTS TO YOUR CART, AND THE DISCOUNT APPLIES AUTOMATICALLY!
SPECIAL OFFER ✦ BUY 2 GET 1 FREE! ✦ ADD 3 PRODUCTS TO YOUR CART, AND THE DISCOUNT APPLIES AUTOMATICALLY!
SPECIAL OFFER ✦ BUY 2 GET 1 FREE! ✦ ADD 3 PRODUCTS TO YOUR CART, AND THE DISCOUNT APPLIES AUTOMATICALLY!
Animation is all about turning imagination into motion, and Blender offers the perfect playground for that. By learning how to animate in Blender, even complete beginners can experiment with movement, cameras, and rendering to bring their ideas alive.
Key Takeaways:
Start by importing a model and adding keyframes to animate movement.
Use the Graph Editor to make animations smoother and more natural.
Exporting as an image sequence gives you more flexibility in editing.
How to Animate in Blender Step-by-Step
Many beginners think animation requires years of training, but Blender proves otherwise. Understanding Blender is about mastering simple steps, like importing models, adding keyframes, and refining movement until you can tell your stories visually with confidence.
1. Importing Models into Blender
You can start by using the default cube for your object or press SHIFT + A to select a different, default model. If you already have a 3D model (downloaded), make sure it’s in the correct format (OBJ, FBX, or DAE).
To import these models into Blender, you can try the easiest way, which is to drag and drop the file directly into Blender’s viewport. If the model doesn’t pop open, navigate to File > Import> choose the correct file type, and then click Import [file type].
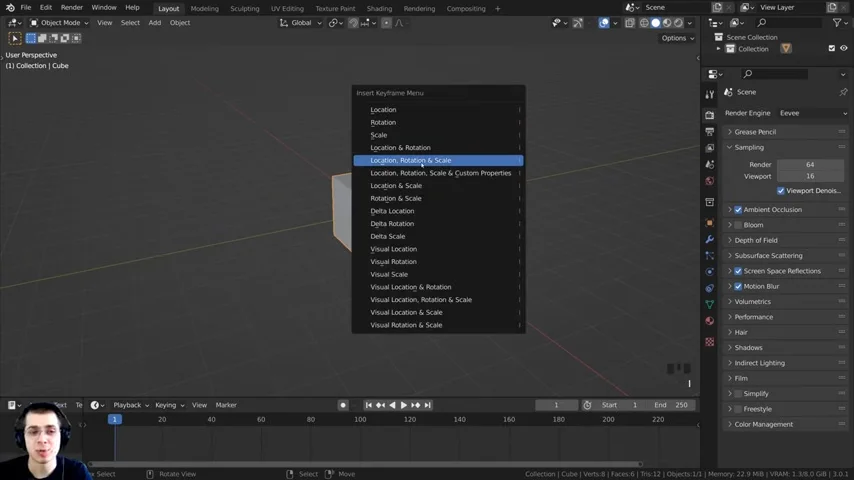
Before adding keyframes, you can look at the bottom of your screen (the Dope Sheet). Right under the familiar play, reverse, and fast forward icons, that’s the timeline of your animation (specifically, the number of frames).
Adding Keyframes (Source: Ryan King Art)
To start adding keyframes, you can press I(to insert a keyframe) and then select what value you want to change. It’s typically the Location, Rotation, and Scale. After selecting it, you will see a yellow diamond on your timeline. That’s the indication that you have already made the initial keyframe.
After playing around with your object’s location, rotation, and scale, press Iagain later in the timeline to set another keyframe. Press play or spacebar if you want to see the object move from one keyframe to another.
There’s a quicker way to set keyframes, which is turning on the Auto Keying button. This circle button can be found near the play button, on the left. But make sure you turn this off once you’re done animating and start another process, like creating settings. Repeat this process and add more keyframes to make a more complex movement.
3. Fine-Tuning Animation
In the Dope Sheet, you can edit, move, or delete your keyframes to make a more desirable animation for your object. Same thing as your object manipulation, you can also move keyframes.
First, select the keyframe,
And press G to grab the keyframe and move it,
If you want to delete it, press X or the Delete button
But if you want to make your object stop moving for some time, select a keyframe and then hold SHIFT + D to duplicate it perfectly in the later timeline.
If you want to change what happens in one keyframe, simply select the keyframe, and then move the object to your desired position, and then press I > Location, Rotation, and Scale. Same as before.
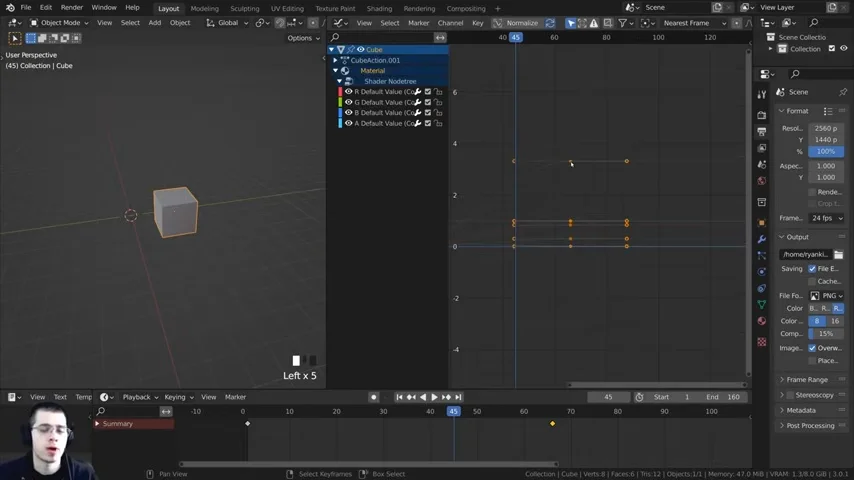
Blender’s Graph Editor (Source: Ryan King Art)
But if you want more control over your object’s movement, you can try the Graph Editor. To understand the Graph Editor, the horizontal line at the top is the timeline frames, and the vertical line on the left is the value of how much something is animated.
So, the dots represented the value of an aspect at a certain keyframe. Once you click a dot, there will be more dots beside it; that’s the handle. Using the handle, you can manipulate your animation in between keyframes. These in-between moves are particularly important if you have two objects interacting.
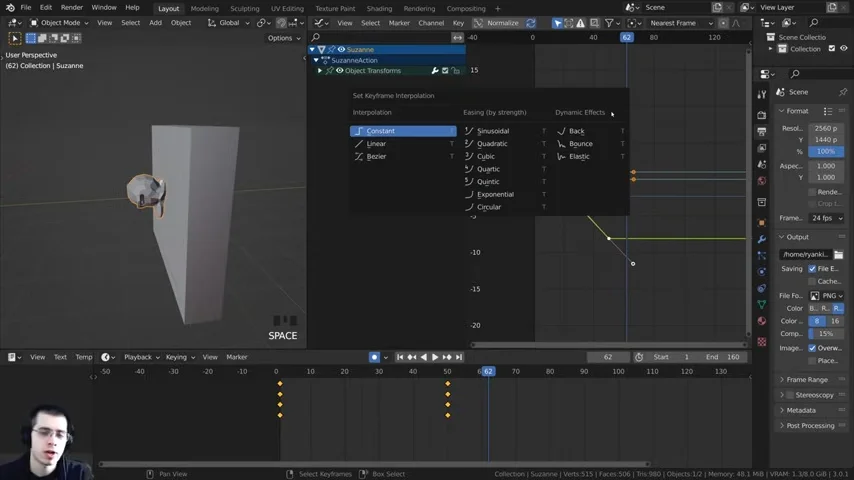
Keyframe Interpolation Presets (Source: Ryan King Art)
For more handle adjustability, there are presets that you can use. While your cursor is hovering over the Graph Editor or the Timeline, press the T button. These additional dots are necessary to manipulate your object to move smoothly, slower, faster, or abruptly stop.
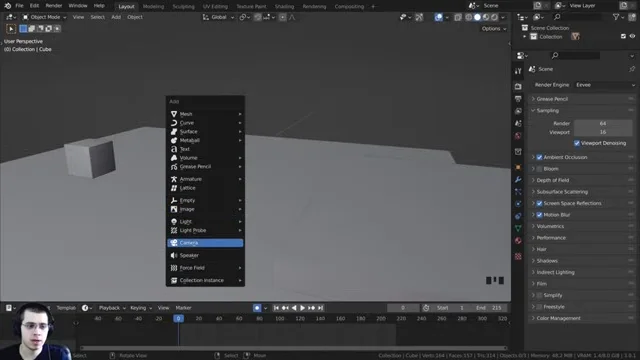
After animating your object’s movement in detail, let’s start capturing its movement to render. First, you need a camera angle. Simply press SHIFT + A and then select Camera.
Adjust the starting point of your camera, and then press CTRL + SHIFT + num pad 0 (zero) to hop the camera to your view. To move the camera, press G to grab and then move it to where you want it.
Similar to the Graph Editor, you can also manipulate the action of the camera in-between keyframes. Simply hover over the timeline, and then press T to open up the preset menu.
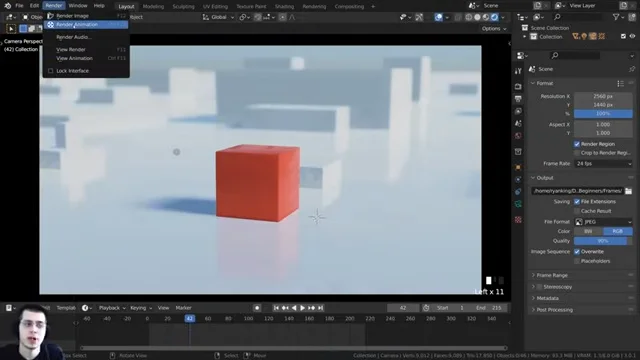
After all of those steps, you’re ready to render. But, how to animate in Blender easily? To avoid any hurdles while rendering, you can use another way. This way of rendering involves turning your animation into an Image Sequence.
Animation Rendering (Source: Ryan King Art)
After rendering all of the frames, you can come back into Blender and use the Blender Video Editor to turn the image sequence into a video. Within the video editor, you can add music or sound effects or do some other editing simultaneously. Finally, exporting it into a video format.
Continuing the Journey: How to Animate in Blender for Beginners
Finishing your first animation is only the beginning. Every project from here will open new challenges and opportunities. Keep creating, keep refining, and let your imagination guide you toward bigger and brighter animation goals.
To jumpstart your animating journey, you can visit Tridimensifor 3D assets, backgrounds, and animations. With already refined essentials, you don’t have to start animating from scratch.